Filters for landscape photography

Slippertalk Orchid Forum

Help Support Slippertalk Orchid Forum:

This site may earn a commission from merchant affiliate links, including eBay, Amazon, and others.

emydura

Well-Known Member
Joined
Oct 4, 2008
Messages
7,584
Reaction score
1,295
Location
Canberra, Australia
From my photos of Murramarang NP, a few people were interested in more detail on graduated neutral density filters which I had used on many of those sunrise/sunset photos. So I thought I’d create a separate post. I thought I might include some information on a couple of other filters I like to use as well. I didn’t expect I would write so much so apologies for the length. Hopefully someone will find it of use.
There are numerous filters you can use but many of these can be easily done in Photoshop so there is not a lot of point using these in the field. The advantage in leaving these to post-production is that if you don’t like the effect it is easy to reverse. However, there are two groups of filters that really need to be used on the camera – the polarizer filter and the neutral density filter.
Polariser Filters
If there is one essential filter then it is the polarizer filter. Polariser filters are great at reducing glare and reflections in an image. This is particularly useful around water. Whenever I photograph waterfalls I always use a polarizer filter. Below are two photographs of the same waterfall. The one on the left has been taken without a polarizer. Notice how the pool of water at the front has a lot of reflections coming off it. There is also a lot of glare coming off the rocks, log and leaves. The overall look is pretty harsh. The photograph on the right has been taken with a polarizer. The water now has no reflections – I can see right through it. There is no glare coming off the rocks or log. The ferns and moss have a much nicer saturated colour.


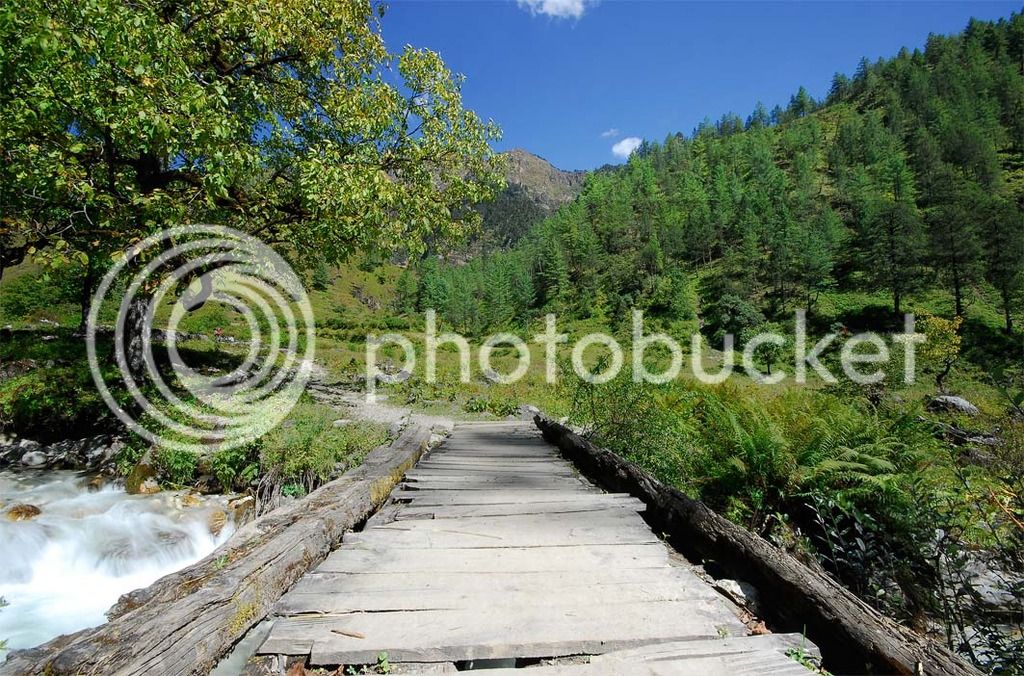
Polariser filters are also useful at deepening the intensity of blue skies as well as giving real punch to clouds (it makes them really pop out at you). I had trouble finding a before and after shot of this but here is one from my trip in Nepal. The first one is taken without a polarizer. Notice how the sky is nowhere near as intensely blue while the clouds pop out at you a bit more in the second photo. The leaves are a lot more saturated in colour in the second photo as well. To be honest the sky in the second photo is a little over the top. At high altitudes the air is so clear that the skies are already very blue. If you add a polarizer filter on top of this, it can look a little fake.


Neutral Density Filters
Neutral density filters are used for reducing the amount of light entering the camera, thereby increasing the length of the exposure. They can be square in shape and slot into a filter holder (see below for more details) but most commonly screw onto the front of your lens.


I find the main reason I might need a ND filter is when I want the water in a waterfall to be soft and blurry. If the light is very bright you may find that the exposure is too fast to get nice blurry movement in the water. Therefore, adding a ND filter will increase the length of the exposure and give the water a softer look. Here is an example of the look you are after.


A neutral density filter that is currently quite popular is the 10 stop ND filter or Bigstopper as it is commonly called. This filter is useful for creating extremely long exposures. So for example, an exposure of one second without the filter can be increased to over 17 minutes with the 10 stop filter. So you can get some pretty extreme effects. It is really good at getting pretty dramatic cloud movement. I have only just bought this filter so I’m still coming to terms with it. Here is one of my first attempts from a couple of weeks ago. This exposure was just over 4 minutes. This photo may not be everyone’s cup of tea. ☺

 
Last edited by a moderator:
Graduated Neutral Density Filters
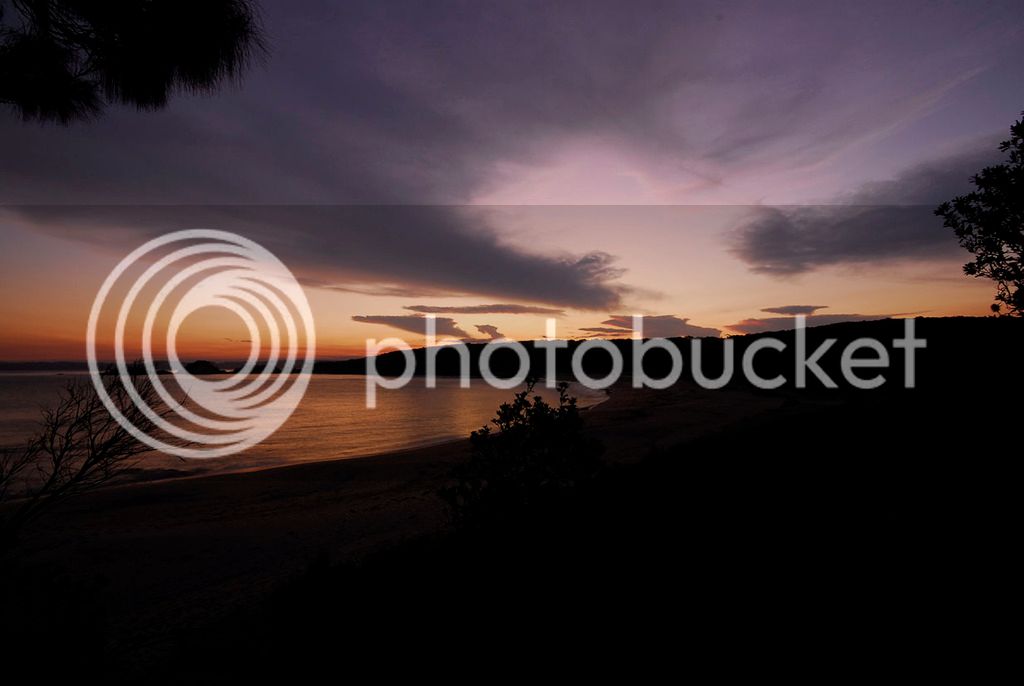
When I first started trying to take nice sunrise/sunset photos the results were terrible. Typically the photos would look like this one. The sky would look OK but the foreground would be so dark you could barely see anything. If I tried to make the foreground brighter the sky would get blown out. No matter what I did the results would always be the same. I studied the photos of the landscape photographers I liked but could not even closely replicate them.


As I studied more I came to realise there was too much contrast in the scene. That is, there is so much variation in light between the lightest and darkest elements, that the camera just cannot handle it. So you end up with some parts of the photo well exposed (generally the sky) but others poorly exposed (foreground).
One of the solutions was to take two or more photos with multiple exposures. In one photo you would expose correctly for the sky and in another you would expose correctly for the foreground. You would then put both photos in photoshop (or some other software) and blend the two images together (example HDR). The composite image would result in perfect exposure throughout the image. I never found this easy. It could be hard to get the photo to look natural. You can also have problems where you have movement in your image (eg. waves, wind blown branches etc.). In one photo the wave could be crashing while in another it could be building up. So the two photos you are trying to blend together are not mirror images. When you try and blend such images it doesn’t look right. The other issue is that spending long periods of time processing photos quickly loses its appeal and pretty soon your hobby becomes a chore.
Another solution I found was using neutral density graduated filters. The graduated ND filter is the same as the ND filter above except that only part of the filter is grey and hence only part of the scene you are photographing will have reduced light. The purpose of the graduated ND filter is to reduce the variation of light in your image, enabling the camera to take a correctly exposed photo. You place the grey part of the filter over the bright area (usually the sky) and the clear part of the filter over the shaded foreground. Therefore, the filter reduces the light over the bright sky but does not reduce the light over the shaded foreground. While you want to even out the light in your photo you can overdo it. You don’t want the shaded foreground to look as bright as the blazing sunset sky. So you still need some contrast.
Graduated filters are normally large and rectangular in shape. They can come in different densities. I have a 1 stop, a 2 stop and a 3 stop grad filter. You can get a 4 stop grad as well. Often in high contrast scenes I combine the 3 stop and the 2 stop grad for a total of 5 stops.


There are also different types of graduated filters that have different purposes. The one on the right is a hard-edged grad. The grey part of the filter is a solid colour from the point of the transition to the top. Therefore the light is blocked evenly in the top half of the filter. In the other two the light is not blocked evenly. The one on the left is a reverse graduated filter. It is a solid colour at the transition but gets softer as you go up. You tend to use these for sunrise/sunset photos in seascapes where the sun on the horizon is very bright but the light at the top is darker. Both the hard-edged and reverse graduated filters have a sharp transition from ND to clear. This can be a problem where you don’t have a straight horizon ( eg.mountains) as you will likely notice a distinct band across your photo at the transition point. In this situation you would use a soft graduated filter as it provides a smooth transition from clear to ND.


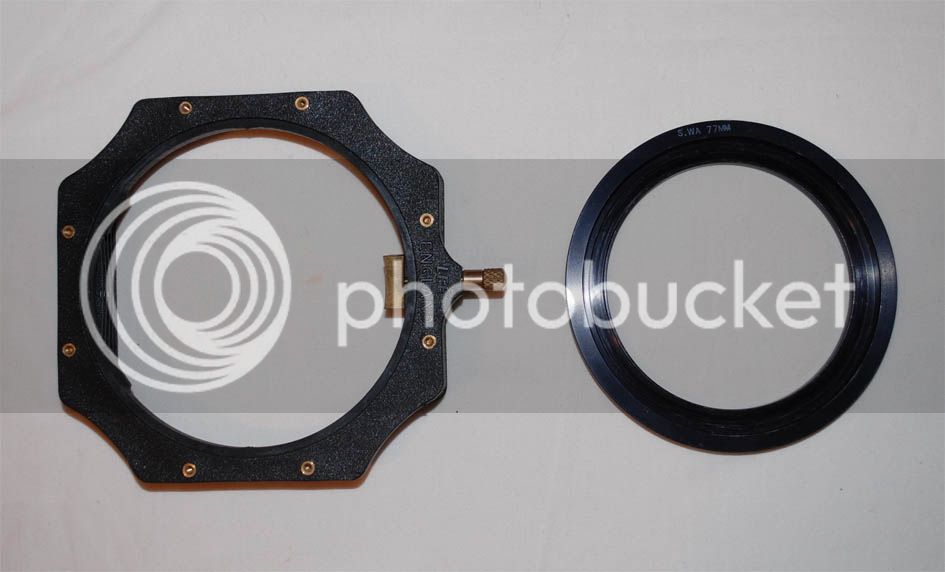
To attach the filter to your lens you need a filter holder. The holder screws onto your lens and you simply slide the filters into the slot. You move the filter up or down depending on where the horizon is in your photo. My holder has three slots so I can use 3 filters back to back if required. You can get screw-in graduated filters but they are pretty useless as the transition point is always half way across your photo. You have no ability to adjust the filter for your composition. In most landscape photos the sky should be roughly 1/3 of the photo in anywise.


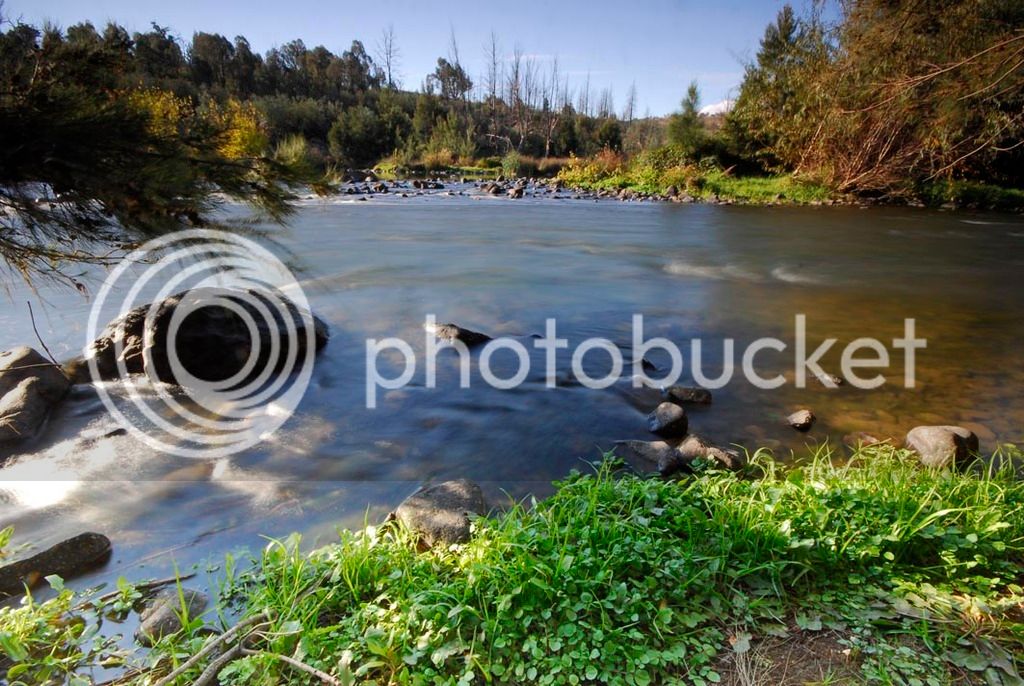
So here is an example of the use of ND grads. This was first photos I took when I received them and I think is a good example of how useful they are. I went down to the Murrumbidgee River here in Canberra and chose a site that had a huge contrast in light. The foreground was under a tree and heavily shaded but the rest of the scene was in bright sunlight. In the first photo I haven’t used any filters. I have chosen an exposure that is the perfect for the foreground. The grass looks pretty good. But the rest of the photo is completely blown out. Therefore way too much contrast in this photo. If I had exposed correctly for the sunny areas, the foreground would have been pitch black. Therefore, I need to use grad filters to reduce the variation in light between the shaded grass in the foreground and the rest of the photo in sunlight.


In this photo I have added a 2 stop soft-edged filter and as you can see it look much better. However, the sky is still blown out a bit and the water is a little too bright.


In this photo I have added a 3 stop soft-edged filter (5 stops in total) and as you can see the exposure is pretty much perfect. Nicely exposed foreground and the sky is lovely and blue and the water is perfect. Sunrise/sunset photos are exactly the same as this and that is why grad filters work so well with them.


I’m sure some of you may be thinking this is cheating. That I am somehow creating a fake image that never existed. Actually it is total opposite. The image I could see with my eye is that last one. The human eye is pretty amazing. When I looked at the bright sky and water, my eye can see every detail. When I looked down at the shaded foreground my eye can instantly adjust. The camera sensor cannot adjust. It can only see a correctly exposed sky or a correctly exposed foreground. It cannot see both. All I’m trying to achieve with these filters is too take a photo that my eye can see but the camera cannot take without some help with filters.
In the photos above I used a soft grad filter as there was no distinct horizon in which to place the transition line. Below is the sort of problem you can run into when trying to use a hard-edge filter in such a photo. The light in front of the grass is a mixture of sun and shade so it is quite tricky. That is why you need a soft grad so there is a gradual transition from ND to clear.


I think the ND graduate filters have been one of the best pieces of camera equipment I have bought. I found them pretty easy to use. Very quickly I was able to take photos I was very happy with and almost comparable with the professionals. The photos I now take are the ones I use to dream about but were previously never in reach.
They aren’t real cheap so you need to think whether you want to invest that much money. Fixing it on the computer maybe a better option for you. There are a few brands. I would stick clear of the Cokin grad filters as they reportedly leave a colour cast. Lee and SinghRay are the deluxe brands. Quality filters but you have to pay for them. I have been using HiTech graduate filters which are about half the price of Lee. People who have used both said they couldn’t tell the difference.

David
 
Last edited by a moderator:
David, awesome. Thanks for that tutorial. You left one thing out though - you need a good camera with an excellent piece of glass between it and all that running water ;)

It helps but I don't think it is essential. Especially expensive glass. Expensive lens are mostly designed for speed, something not required in landscape photography. I saw a comparison of the Nikon 18-55 mm kit lens (costs about $85) against the Nikon 17-55 f2.8 (costs about $2500). At aperatures like f8 the cheap kit lens came out ahead. These are the sort of aperatures you would use in landscape photography so there was no advantage in using the expensive lens. Not only would your wallet be lighter, so would your backpack. Those big lens way a tonne.

That is the good thing about landscape photography. You don't need really expensive equipment.

A good camera can have some features that can really help you take better photos. But you can take nice photos even with an entry level SLR. At the end of the day, good photographers take good photographs not good cameras.

David
 
I think the keyword here is "nice" photos. One can take nice photos, even good photos, with inexpensive lenses. But for excellent, sharp, clear photos, good glass is a better option. Nonetheless, I do agree that it is the poor craftsman that blames his/her tools. One does not need an SLR to make good photos.

Very good lesson on filters.

As a personal choice, I'd take the first two photos into photoshop and combine the bottom part of the first photo with the upper part of the second. I like the way the reflections on the water give depth to the water there. Again, as you say, my eyes would have seen all that at once in that scene. So, although it would have been "manipulated" in photoshop, the purpose would have been to give a more real view.

Yes, reflections on water are often a good thing.

I do agree with you on lens quality. Good glass is always the better option. I really see the distinction when shooting at larger apertures for portraits etc. It is like chalk and cheese. At smaller apertures I find the distinction is more subtle. I found it interesting and amazing that tests showed the cheaper 18-55 lens to be sharper at smaller apertures then the pro 17-55 f2.8. But then the pro lens was far superior at larger apertures which you would expect and why you would fork out all that money.

If money is an issue I have found that prime lens such as 50 mm f1.4 and 85 mm f1.8 give astonishing results for the money. It just means you may have to move your feet. :)

David
 
Thanks a lot David for opening my eyes a bit :) !!!!

2 questions directly:
- do you let the camera decide of the exposure time, or are you working manually?
- does the filter holder fit on different diameter lenses?

More questions to come, surely!!

Jean
 
Thanks a lot David for opening my eyes a bit :) !!!!

2 questions directly:
- do you let the camera decide of the exposure time, or are you working manually?
- does the filter holder fit on different diameter lenses?

More questions to come, surely!!

Jean

In terms of the grad filters, yes I let the camera decide the exposure time. I generally shoot in the aperture mode (A). I may change the exposure time from there if I think appropriate (after checking the histogtram etc.). Many people suggest you should get the exposure you want before you put the grad filter on. You spot meter the foreground to get the correct exposure, then change to manual, recompose your photo, slot the filter in and then take the photo. Personally I have found the camera nails it pretty well every time with the grad filters in so I have no need to follow that complex setup.

Below is a photo of the holder setup. The ring on the right screws onto your lens. This can be any size diameter depending on your lens. Mine is 77 mm as you can see. You can do as I have done and buy adapter rings. I have a 77mm to 52 mm adapter ring if I want to use my 52 mm lens for example. The ring on the right of the photo is held in the holder by that pin.


David
 
Last edited by a moderator:
Extremely informative write-up. Thank you David for putting this together. I know a bit of time was spent on this.
Mentioning brand names- ever so important. Too much overpriced crap out there.

Qs-
Do you shoot RAW?
May I copy your print for my personal use?

Thank you.
 
Extremely informative write-up. Thank you David for putting this together. I know a bit of time was spent on this.
Mentioning brand names- ever so important. Too much overpriced crap out there.

Qs-
Do you shoot RAW?
May I copy your print for my personal use?

Thank you.

Thanks Clark. Yes, I shoot RAW. Happy for you to copy it.

Lee and SinghRay really are quality filters. They are what the professionals use. If I was loaded I would get these but I don't think you lose much with the Hitechs. I should have mentioned that the holder I use is a Lee holder.

David
 
David - Thanks. I really enjoyed the read. This is getting printed. I inherited some nice manual lenses that I can fit on my DSLR and I'm sure this will come in handy one day.
 
This article was so good to me, I thought I would bump it.
It was my go to reference for shopping.
My hands are killing me this week, so I am going to cheat and post links.
This is not a plug for vendor, although I find them to be on my credit card often.


David, I bought these before a 12 day trip to Grand Canyon(both rims), Horseshoe Bend, Sedona, Zion and Bryce.

Kit
http://www.bhphotovideo.com/c/product/87108-REG/LEE_Filters_FK_Foundation_Kit_Standard_4x4.html


77mm ring
http://www.bhphotovideo.com/c/searc...le+Lenses&N=10087147&InitialSearch=yes&sts=pi


Circular polarizer
http://www.bhphotovideo.com/c/searc...ss+Filter&N=10216637&InitialSearch=yes&sts=pi


This is my favorite. I love it so much, when I break it out, I do a silly little chant. Exactly like this- https://www.youtube.com/watch?v=hJPg1Fivmqg
Gotta love Ted Knight. I know people look at me chanting to my filter case at 5:30am.:D
http://www.bhphotovideo.com/c/product/615228-REG/Singh_Ray_R_63_Daryl_Benson_4x6_Reverse.html

Also got a 2-stop and 3-stop ND Grad Soft by Lee Filters.


For the trip to Crystal Mill in Colorado last fall, I bought the Little Stopper.
I thought the Big Stopper was a bit much, but I will be getting the 10-stopper eventually.
I am using the Little Stopper topped with the Circular polarizer here- http://www.slippertalk.com/forum/showthread.php?t=35076

The Little Stopper is a 6-stop filter for anyone that doesn't know.
Combine it with the circular polarizer, and your at about 7.5-stops.(or so I have read)

Without this read, I would of been lost when shopping.
Thanks again David.

For anyone going this route, I recommend getting these covers to save time in the field. I left them home on the 12 day trip :eek: :eek: :eek:
http://www.bhphotovideo.com/c/product/491475-REG/LEE_Filters_LENSCAP_White_Adapter_Ring_Caps.html
 
You have got some great gear there Clark. All top quality. I'll have to get one of those Singh Ray grads. They are the best.

I assume you must have a Lee holder that enables you to rotate that square polarizing filter?


I noticed at the start of the thread that a few of the photo links aren't working. I'm not sure why as I haven't deleted any. The problem is I can't work out how to get the photos back in as I can't edit any of those earlier posts. Can anyone offer assistance?
 
nice tutorial..I use Photoshop myself (Layer Masking) ..but if you aren't into post production, ND is the way to go for good shots
 

Latest posts

Back
Top