


Introduction
Greetings everyone. In the mid 2000s I posted a couple of series of threads on an orchid forum titled “The sanderianum Chronicles” and “The kovachii Chronicles”. The Chronicles presented my first forays into growing Paphs and Phrags from flask in a home environment using a very basic set up.
These Chronicles are presented as a very detailed “how to” approach to getting Paphiopedilums from flask to stable seedling size, with the caveat that “how to” means “how I have done it”. I am writing from the perspective of the home grower with limited space, and no interest in making investments in expensive technology.
What these Chronicles are NOT is a lecture or an absolute path to a guaranteed ends. This is merely my own journey, based in my own experiences plus advice from others over the years. Every flask is different, and every growing environment is different. At the end of the day there are certain core techniques that are essential to success, but those techniques do not paint the entire picture. You will see my success or failure in real time, along with my decisions. And I welcome any feedback- or secondary discussions- along the way. In past installations of the Chronicles, I and others who followed them benefitted greatly from advice and insight offered by fellow readers.
This particular edition is titled “The Coryopedilum Chronicles” since they will focus on the growing out of five species from the section- adductum v. anitum, platyphylum, randsii, rothschildianum and sanderianum.
Setting Up
Following is the list of all items purchased for initial setup,
1. Metro Shelving 48”x18” starter unit
2. Four T8 basic 2 bulb shop light fixtures
3. 10 pack of Phillips T8 32W 48” Natural Light bulbs, 2850 lumens, 5000k color temp
4. Small fan
5. Humidifier; smallest possible that can run for 12+ hour on a full tank
6. Power strip with on/off switch
7. 5 gallon bucket
8. Lidded container to store potting media
9. Set of plastic mixing bowls
10. Large metal scoop for mixing and scooping potting media
11. Thermometer that also measures humidity and reports high/low values for past 24 hours
12. One dozen semi-opaque pint plastic food containers with lids
13. 2 spray bottles- one for water and one for fungicide/pesticide as needed
14. Large mesh metal strainer
15. 12x22 plastic trays (heavy duty versions well worth the small additional investment)
16. 4 inch plastic azalea pots- the deep ones with 8 large holes in the bottom
17. Plastic labels
18. Marking pen specially designed for use on plastic labels
19. A few gallons of RO water for preparing mix and first watering
20. Plastic peanuts
21. Physan 20
22. Small grade fir bark
23. Small grade charcoal
24. Medium grade perlite (aka sponge rock)- an important point, I like to have a larger grade of perlite in the mix to help maintain proper aeration
25. Pro-Mix
Historically when setting up the Metro Shelves, I would allow for about 12 inches from the top of the compots to the light source for the first few weeks after deflasking. But back then I was using T12s that are not as intense as what I am using this go around- so to start off that difference is going to be about 15 inches for at least a week and we will see how it goes.
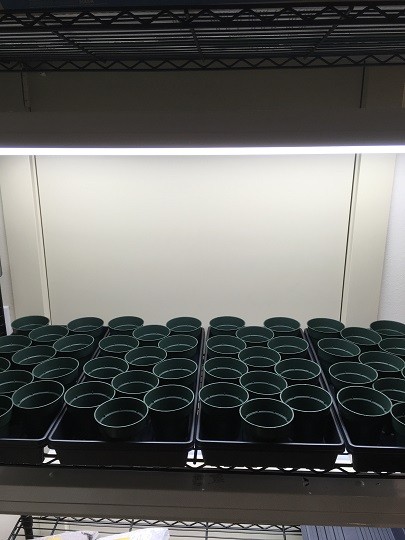
As the below photo shows, with this setup you can fit 4 trays with 12 pots per tray. Historically, I have found one flask usually fills 3 pots with the largest 6-8 seedlings occupying one pot, and the remainder filling the other two (my vendors generally claim 25 plants per flask- but in practical terms that usually ends up being 30-40 not counting very tiny plants/protocorms that are not likely to live.) In any event, this one shelf should provide room for deflasking and initial growing out of about 16 flasks provided you are fully separating and grading the seedlings when deflasking.
Potting mix
I am not sure what the latest and greatest thing is today, but back when I last undertook this exercise there was a raging debate about CHC versus fir bark. I tried both. The CHC did not have much of an advantage with Paphs, but Phrag. kovachii grew like a week in the stuff. In just a matter of months out of flask the root systems were at least double the size of plants grown in fir bark. But like most kovachii first generation out of the wild, those plants eventually died- and so we will never know if residual traces of salt were a primary cause. One thing I will say is that prepping CHC is a messy process. It took me several weeks- with several fresh soakings in RO water and wringing out the CHC one towel-full at a time between water changes. As it did not really matter much with the Paphs, I am going with a fir bark based medium.
My mix is much as it always was save that with the passage of time I have used a great proportion of fir bark and Pro-Mix (the former for better moisture retention and the latter because much of it washes out of the pots in the first few waterings.) The mix prepared below is approximately 4 parts fir bark to 1 part each of perlite (sponge rock), charcoal and Pro-Mix.
When I was searching for good resources for potting media, I noted that many vendors will now custom mix whatever you want. That is a wonderful thing- but I believe it leaves you at an enormous disadvantage since I have found it is really important to soak your fir bark for a few days before use so that it will more readily take on and retain water. It will eventually perform as it should if you use it dry when potting, but in the meantime it will not function ideally which means more frequent watering and also the issue of it floating in the pot during watering and separating from the other components of your mix.
For the soaking of fir bark- 2 days is usually sufficient. Simply put the fir bark into a large open container, and then add RO water until it is just about level with the top of the fir bark assuming it had not started floating when you added water (and it will float!) I strongly advocate using RO water to soak your bark so that you are starting with a clean slate at potting time. Tap water is often just fine for growing out orchid seedlings- it certainly was fine when I lived in Austin- but until you know that for sure, I think it is safest that your base potting media not carry any of the potential risks of your local tap water.
Once you have added the water, leave the container open- and periodically punch down the fir bark plus stir it around a bit to ensure that the top layer get down into the water so it can soak as well as the rest. Very important note here- fir bark contains very fine splinters, and even a very small one barely puncturing the surface of your skin can create swelling or other discomfort until you can find and remove the splinter. For that reason, it is best to use gloves- or at least put your hand in a plastic bag- when handling dry fir bark. I find that once it has been soaked, it is generally safe to handle without gloves.
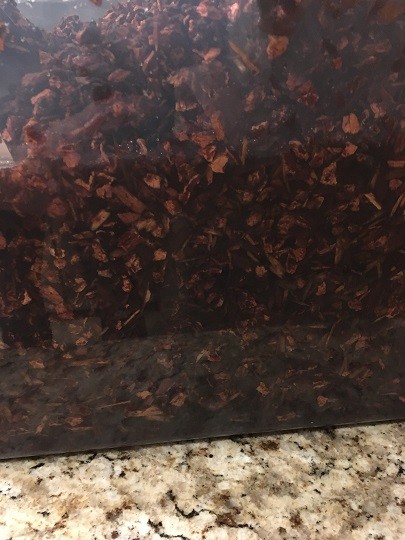
The best way to know if the bark is properly soaked is to determine if it has settled to the bottom of the container. I use clear containers to soak the fir bark and store finished mix since that is the best way to keep an eye on it. As the below photo shows, the bark has sunk to the bottom of the container- and so we are ready to go.
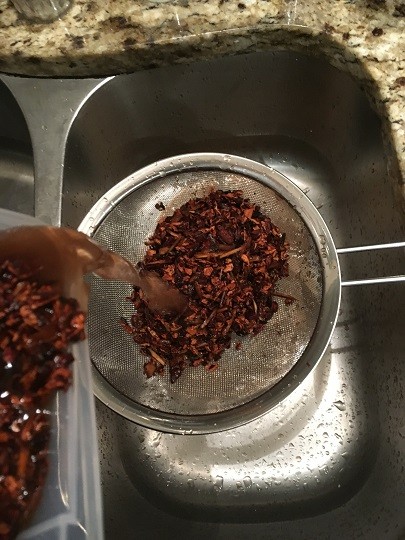
For mixing with other materials, I find it best to scoop the bark out of the soaking container into a bucket. It is good to bring along a little of the water so the Pro-Mix will get properly soaked, but when you get into the lower half of the bark, strain out excess water (as shown below) so that you are not making a soggy mix that will be prone to fungal growth and premature break-down as it sits awaiting use.
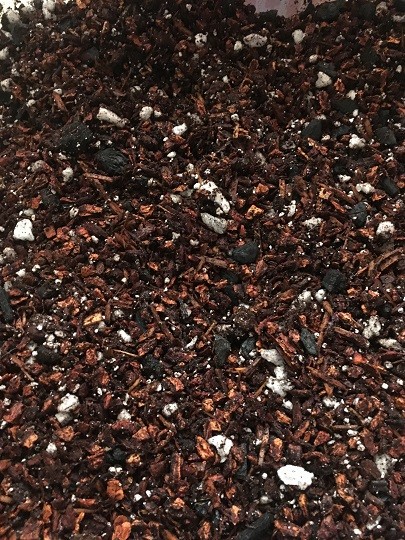
And here is a closeup of the final mix.
Ready for the plants
All is now set for the arrival of the flasks. I have had the growing area set up for the past few days (with lights off) and have been monitoring the findings of the thermometer that also measures humidity.
Average temp of 72 with a high of 73 and a low of 72, which is good (remember that when the lights are on for 10+ hours a day the temp will go up a bit during the daytime), and humidity ranging from 53 to 62 with an average of 58 which is outstanding for an in-home environment when it comes to orchid growing. This set up is in my bathroom, plus this is Texas, so that might explain the readings here. And remember with the introduction of moisture courtesy of watering the plants, that will go up some in the immediate vicinity of the plants.
Note- the humidifier is on standby in case the plants do not quickly recover from the “hardening” process that takes place in the first few days after deflasking. When I first started tinkering with Paphs out of flask, I had the humidifier running from day 1 and it only encouraged rot. So these days I have it on standby on a “just in case” basis. When Paphs are lacking in humidity and moisture out of flask- they will let you know pretty quickly in a matter of days. But if you have overdone it, rot can take hold in a matter of hours and become inescapably fatal in less than a day.
The next chapter
The first round of flasks arrived today. Part II of the Chronicles to come late Sunday or Monday once everything has been out of flask for at least 48 hours.
Greetings everyone. In the mid 2000s I posted a couple of series of threads on an orchid forum titled “The sanderianum Chronicles” and “The kovachii Chronicles”. The Chronicles presented my first forays into growing Paphs and Phrags from flask in a home environment using a very basic set up.
These Chronicles are presented as a very detailed “how to” approach to getting Paphiopedilums from flask to stable seedling size, with the caveat that “how to” means “how I have done it”. I am writing from the perspective of the home grower with limited space, and no interest in making investments in expensive technology.
What these Chronicles are NOT is a lecture or an absolute path to a guaranteed ends. This is merely my own journey, based in my own experiences plus advice from others over the years. Every flask is different, and every growing environment is different. At the end of the day there are certain core techniques that are essential to success, but those techniques do not paint the entire picture. You will see my success or failure in real time, along with my decisions. And I welcome any feedback- or secondary discussions- along the way. In past installations of the Chronicles, I and others who followed them benefitted greatly from advice and insight offered by fellow readers.
This particular edition is titled “The Coryopedilum Chronicles” since they will focus on the growing out of five species from the section- adductum v. anitum, platyphylum, randsii, rothschildianum and sanderianum.
Setting Up
Following is the list of all items purchased for initial setup,
1. Metro Shelving 48”x18” starter unit
2. Four T8 basic 2 bulb shop light fixtures
3. 10 pack of Phillips T8 32W 48” Natural Light bulbs, 2850 lumens, 5000k color temp
4. Small fan
5. Humidifier; smallest possible that can run for 12+ hour on a full tank
6. Power strip with on/off switch
7. 5 gallon bucket
8. Lidded container to store potting media
9. Set of plastic mixing bowls
10. Large metal scoop for mixing and scooping potting media
11. Thermometer that also measures humidity and reports high/low values for past 24 hours
12. One dozen semi-opaque pint plastic food containers with lids
13. 2 spray bottles- one for water and one for fungicide/pesticide as needed
14. Large mesh metal strainer
15. 12x22 plastic trays (heavy duty versions well worth the small additional investment)
16. 4 inch plastic azalea pots- the deep ones with 8 large holes in the bottom
17. Plastic labels
18. Marking pen specially designed for use on plastic labels
19. A few gallons of RO water for preparing mix and first watering
20. Plastic peanuts
21. Physan 20
22. Small grade fir bark
23. Small grade charcoal
24. Medium grade perlite (aka sponge rock)- an important point, I like to have a larger grade of perlite in the mix to help maintain proper aeration
25. Pro-Mix
Historically when setting up the Metro Shelves, I would allow for about 12 inches from the top of the compots to the light source for the first few weeks after deflasking. But back then I was using T12s that are not as intense as what I am using this go around- so to start off that difference is going to be about 15 inches for at least a week and we will see how it goes.
As the below photo shows, with this setup you can fit 4 trays with 12 pots per tray. Historically, I have found one flask usually fills 3 pots with the largest 6-8 seedlings occupying one pot, and the remainder filling the other two (my vendors generally claim 25 plants per flask- but in practical terms that usually ends up being 30-40 not counting very tiny plants/protocorms that are not likely to live.) In any event, this one shelf should provide room for deflasking and initial growing out of about 16 flasks provided you are fully separating and grading the seedlings when deflasking.
Potting mix
I am not sure what the latest and greatest thing is today, but back when I last undertook this exercise there was a raging debate about CHC versus fir bark. I tried both. The CHC did not have much of an advantage with Paphs, but Phrag. kovachii grew like a week in the stuff. In just a matter of months out of flask the root systems were at least double the size of plants grown in fir bark. But like most kovachii first generation out of the wild, those plants eventually died- and so we will never know if residual traces of salt were a primary cause. One thing I will say is that prepping CHC is a messy process. It took me several weeks- with several fresh soakings in RO water and wringing out the CHC one towel-full at a time between water changes. As it did not really matter much with the Paphs, I am going with a fir bark based medium.
My mix is much as it always was save that with the passage of time I have used a great proportion of fir bark and Pro-Mix (the former for better moisture retention and the latter because much of it washes out of the pots in the first few waterings.) The mix prepared below is approximately 4 parts fir bark to 1 part each of perlite (sponge rock), charcoal and Pro-Mix.
When I was searching for good resources for potting media, I noted that many vendors will now custom mix whatever you want. That is a wonderful thing- but I believe it leaves you at an enormous disadvantage since I have found it is really important to soak your fir bark for a few days before use so that it will more readily take on and retain water. It will eventually perform as it should if you use it dry when potting, but in the meantime it will not function ideally which means more frequent watering and also the issue of it floating in the pot during watering and separating from the other components of your mix.
For the soaking of fir bark- 2 days is usually sufficient. Simply put the fir bark into a large open container, and then add RO water until it is just about level with the top of the fir bark assuming it had not started floating when you added water (and it will float!) I strongly advocate using RO water to soak your bark so that you are starting with a clean slate at potting time. Tap water is often just fine for growing out orchid seedlings- it certainly was fine when I lived in Austin- but until you know that for sure, I think it is safest that your base potting media not carry any of the potential risks of your local tap water.
Once you have added the water, leave the container open- and periodically punch down the fir bark plus stir it around a bit to ensure that the top layer get down into the water so it can soak as well as the rest. Very important note here- fir bark contains very fine splinters, and even a very small one barely puncturing the surface of your skin can create swelling or other discomfort until you can find and remove the splinter. For that reason, it is best to use gloves- or at least put your hand in a plastic bag- when handling dry fir bark. I find that once it has been soaked, it is generally safe to handle without gloves.
The best way to know if the bark is properly soaked is to determine if it has settled to the bottom of the container. I use clear containers to soak the fir bark and store finished mix since that is the best way to keep an eye on it. As the below photo shows, the bark has sunk to the bottom of the container- and so we are ready to go.
For mixing with other materials, I find it best to scoop the bark out of the soaking container into a bucket. It is good to bring along a little of the water so the Pro-Mix will get properly soaked, but when you get into the lower half of the bark, strain out excess water (as shown below) so that you are not making a soggy mix that will be prone to fungal growth and premature break-down as it sits awaiting use.
And here is a closeup of the final mix.
Ready for the plants
All is now set for the arrival of the flasks. I have had the growing area set up for the past few days (with lights off) and have been monitoring the findings of the thermometer that also measures humidity.
Average temp of 72 with a high of 73 and a low of 72, which is good (remember that when the lights are on for 10+ hours a day the temp will go up a bit during the daytime), and humidity ranging from 53 to 62 with an average of 58 which is outstanding for an in-home environment when it comes to orchid growing. This set up is in my bathroom, plus this is Texas, so that might explain the readings here. And remember with the introduction of moisture courtesy of watering the plants, that will go up some in the immediate vicinity of the plants.
Note- the humidifier is on standby in case the plants do not quickly recover from the “hardening” process that takes place in the first few days after deflasking. When I first started tinkering with Paphs out of flask, I had the humidifier running from day 1 and it only encouraged rot. So these days I have it on standby on a “just in case” basis. When Paphs are lacking in humidity and moisture out of flask- they will let you know pretty quickly in a matter of days. But if you have overdone it, rot can take hold in a matter of hours and become inescapably fatal in less than a day.
The next chapter
The first round of flasks arrived today. Part II of the Chronicles to come late Sunday or Monday once everything has been out of flask for at least 48 hours.
Last edited: